Last updated: 2025-08-27
Spring Modulith vs Multi-Module projects - advantages and disadvantages
Modularization is the most important factor for the long-term maintainability of a growing codebase. Two powerful options are available for Spring Boot projects: Spring Modulith and a multi-module setup. How do they differ, and which approach should you choose for your project?
Spring Modulith and Multi-Module explained
With Spring Modulith, the main focus is on splitting the actual Java or Kotlin code into modules. Under a main package (for example my/company/app) all subpackages are treated as modules (for example product, inventory). Access to another module is only possible through a defined interface - usually a service in the top-level package of a module as well as other packages that are explicitly exposed. Internal details like repositories and entities are not available.
The entire structure is verified by the spring-modulith libraries. Other artifacts are taken from src/main/resources, just like in a monolith. With this approach, practically all external libraries of the application can be used without restrictions.
Multi-module projects are based on the native ability of Gradle or Maven to manage multiple subprojects and integrate them into the build process using the Spring Boot plugin. Each module has its own folder in the project (for example app/product, app/inventory) and each module has its own src/main/java (or src/main/kotlin) and src/main/resources folders. These modules are built as real jars - in the final executable fat jar, all other libraries are included again.
Differences in practice
An existing monolith can be converted to a Spring Modulith project relatively quickly - you only need to add the dependency and change the package structure. IntelliJ even shows the modules and breaches directly. Hardly any changes are needed in the code itself, only the module interfaces must be defined and used correctly.
For multi-module projects, no additional library is required, but the build files (build.gradle, build.gradle.kts or pom.xml) need much more adjustment. Access is only possible along the defined dependency path - imports outside of the integrated modules are technically not possible. Restricting access to internal classes is not built in and should be defined through coding guidelines rather than code restrictions.
For integration tests that cover the entire application, both approaches achieve a similar goal but in different ways.
- With Spring Modulith, the annotation
@ApplicationModuleTestwithBootstrapMode.ALL_DEPENDENCIESis used. This runs a test in the current module including all dependent modules. Since Spring Modulith determines modules at runtime based on actual dependencies, missing modules may need to be added viaextraIncludes. This can be the case, for example, if a module only contains configuration and has no exposed services. - For multi-module projects, module dependencies are always explicitly defined in the build files (for example
api project(':product')in abuild.gradle). When integration tests with@SpringBootTestare run, the application automatically starts with the context available for that module. Since each module also provides its own resources, only those are actually available (for example, only the included Flyway scripts are executed).
Some libraries also require additional configuration to operate in a multi-module setup. While libraries like Flyway and Thymeleaf work almost out of the box, support for others such as jte is missing completely and must be provided separately.
Choosing an approach
Both modularization approaches achieve the main goal of logically splitting the code and thus ensuring long-term maintainability. This makes both approaches clearly better than a monolith, often called the “big ball of mud.” In both cases, it is important to design the module structure around your domain, not around technical layers - so better product, inventory, order instead of services, controller, frontend. More details in best practices for multi-module projects.
Spring Modulith differs less from a monolith, so the learning and configuration effort is smaller. Interfaces need to be clearly defined, which can be either an advantage or a disadvantage. A special test can also generate documentation of the current module structure.
The higher setup effort of multi-module projects comes with the benefit of real, logical modules. All artifacts are directly assigned to a module, making it easier to split work within a team. The code itself is not aware of the modules, since the structure is managed by Maven or Gradle.

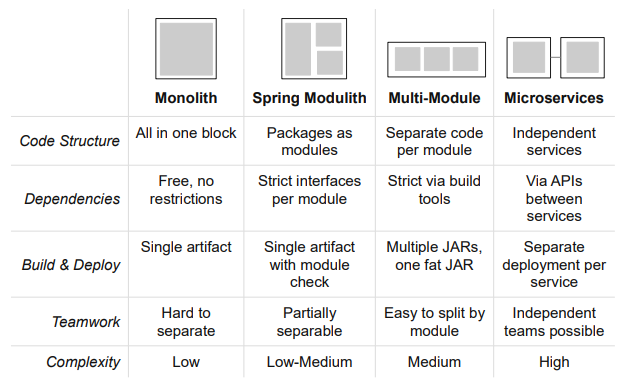
Overview of modularization options in Spring Boot
In both approaches, individual modules can later be separated into microservices if needed. However, this step should be carefully considered - architecture is not an end in itself, but the added benefits should clearly outweigh the new costs.
In the Bootify Builder, you can create a modularized Spring Boot app using either Spring Modulith or the multi-module approach. Define your custom module structure, including the assignments of entities and Spring Security configs, and get the full setup directly in the browser.
See Pricing
or read quickstart