Last updated: 2025-01-04
Generating JPA Entities from an existing SQL Script
Let's assume we have an existing database and want to create the JPA entities from it. For this we can use Bootify's SQL import - and get the classes including relations prepared for our chosen database. We can use the full Spring Boot application or just pick individual JPA entities.
Project preparation
To get to the import, we first start a new project via the start project link in the header. In the database settings the target database can now be selected. Depending on the selection, there are always some special features that are automatically taken into account by Bootify - e.g. for PostgreSQL the table name "user" is a keyword and therefore has to be provided in quotes at the entity.

Preparing general settings of our new project
Since we want to connect our application to an existing database, we set the schema generation to "None (validate only)". This way, Hibernate will not try to create or update the schema on its own when starting the Spring Boot application. Instead, it will perform a basic validation to detect mapping issues between the entities and the actual schema early on. If necessary, manual adjustments have to be made to the code afterwards.
The names of the JPA entities should always be in singular form - if our current schema has plural table names, the pluralize option can be activated. All entities are generated with getters and setters. By enabling the option for Lombok, @Getter and @Setter are added as annotations instead.
SQL Import
This brings us to the Entities tab, where the SQL import can be started.

Starting the SQL import in the Entities tab
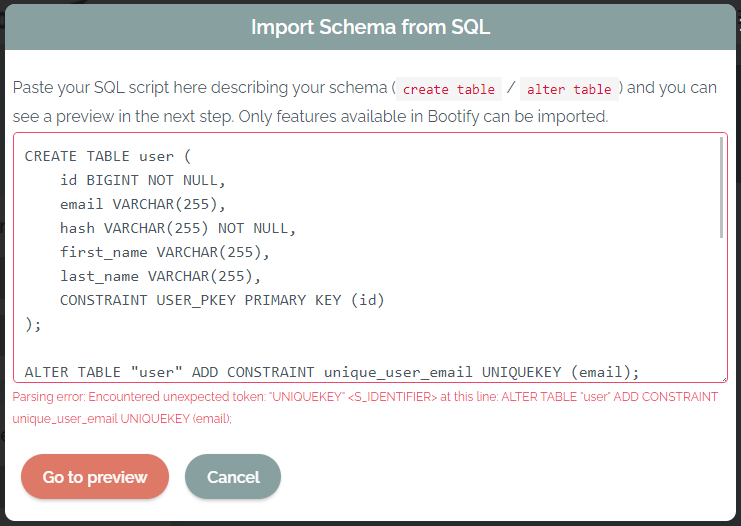
In the following modal the SQL script can be copied in. There are many different (and conflicting) SQL dialects, so any problem with the input is immediately returned as a validation error. In this case we can fix them or start with smaller parts of the script to get a first valid result.

Getting a validation error parsing our SQL
After we have successfully mastered this step, we can already see a preview of the tables including their relationships to each other. Below the preview we can already activate CRUD options for our new entities. This will generate DTOs, controllers and templates for our selected frontend stack if required.
After performing the import, the tables are available in our project as entities and can be further customized if needed.

Our created entities after the import
When we're happy with the result, we can explore and download the generated code! The entities can be used individually or together with the generated Spring Boot application.

Exploring the source code of our new entities
The SQL import is included in the Free plan of Bootify. In the Professional plan advanced functions can be added to our application - e.g. Flyway or Liquibase to generate the necessary setup and initial scripts. After adding a breakpoint, changes to the database schema are collected in dedicated changelogs as well.
Start Project
No registration required