- • Quickstart
- • Documentation
- • Next Steps
- • AI Coding
- › Spring Boot
- • Spring Data
- • Spring Security
- • Frontend
- • Code Generation
Last updated: 2026-09-26
Migrating to Spring Boot: How it's done in 2026
Migrating an existing application to Spring Boot in 2026 can leave most of the implementation work to an AI coding agent. Why Spring Boot? Auto-configuration makes it easy to get started, while the ecosystem covers data access, security, testing and many other everyday requirements. For the migration itself, we let the agent analyze and implement the code while we review the plan, clarify business rules and check the results.
Prepare the codebase and migration plan
We start by moving the old application code into a legacy/ subdirectory, keeping it available to the agent as a reference in the same workspace. The new Spring Boot project will live at the repository root. Once the migration is complete and verified, we delete the old code.
Before writing the replacement, we ask the agent to understand the existing behavior and divide the migration into small, verifiable steps.
We document the rules from the old code and any existing tests, then use them as acceptance criteria for the new implementation.
Create the foundation with Bootify MCP
After reviewing the plan, we connect the Bootify MCP and ask the agent to prepare the application. Bootify generates the project structure in Spring Boot 4.1.1, with our chosen build tool, database and optional frontend. We can inspect the generated code in the browser before exporting it.
For larger applications, Spring Modulith or a multi-module setup can separate business areas. Our multi-module best practices explain how to define useful boundaries. We stay close to standard Spring Data and Spring Security conventions so that developers and agents can work with familiar patterns.
The optional Docker Compose integration helps make local services reproducible. Our first milestone is already a startable application with passing tests, even though its business features have not yet been migrated.
Connect the existing database
Usually, we can keep the existing database schema. Bootify's SQL import, available through the MCP or the Entities tab, provides a starting point for the entities and relations. We compare the imported model with the original schema, paying attention to table and column names, identifiers, relationships and data types.
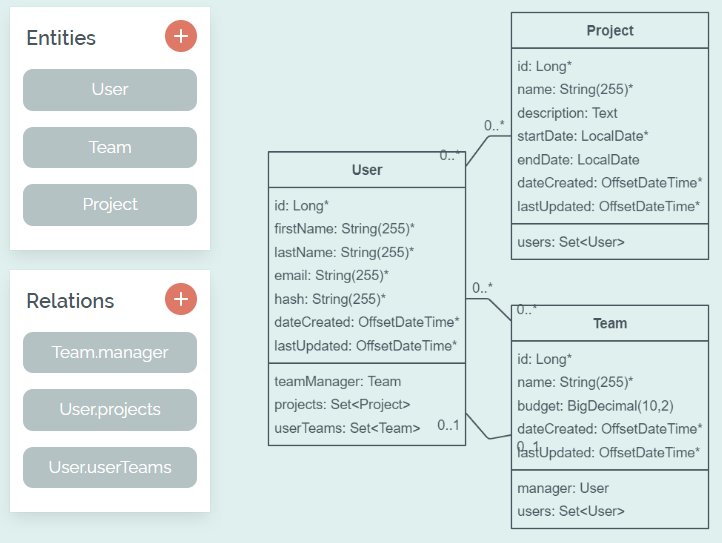
The imported database schema in Bootify
During development, we connect to a separate copy of the existing database with representative data. We select validate only for schema generation so that Hibernate reports mapping mismatches on startup without changing the tables. Existing schema changes managed by Flyway or Liquibase also need a deliberate baseline; scripts that create a fresh database must not run against populated tables.
Migrate and verify one feature at a time
We now transfer one complete business flow at a time. Each step includes its business logic, validation, permissions and relevant UI or API behavior. Generated CRUD code is a starting point; the legacy code remains our reference for the actual rules.
After every step, the application must start and the tests must pass. We also review the changed flow against the documented behavior and legacy code. Small technical adjustments can happen along the way when they preserve behavior, but new features and deliberate behavior changes should wait until the affected flow has been migrated and verified.
Making the migration a success
In 2026, we plan the migration and let AI implement it. Coding agents are particularly efficient at tasks like transferring existing business logic into a new project structure. Bootify provides that structure so we do not have to develop it from scratch. The Professional plan adds features such as Spring Security configuration and automatic Git integration to support the migration and ongoing maintenance.
The MCP is available at https://bootify.io/mcp without authentication.
Registered customers may add their MCP API key as
Authorization: Bearer header.
Codex
Codex can configure an MCP directly in the chat. The new MCP is then included in
~/.codex/config.toml. You may need to restart ChatGPT.
Claude Code
Claude Code also provides a CLI that can be run manually or through the chat. The configuration is then
stored in ~/.claude.json and usually requires a restart.
See Pricing
or read quickstart