Last updated: 2025-07-29
Security tab - backgrounds
The Security tab is available for projects in the Professional plan. This allows to create one or more security configs with JWT, form-based login, Keycloak resource server, Keycloak via OAuth/OIDC or basic authentication. For each Security Config, one or more roles can be defined together with the areas which each role is allowed to access.

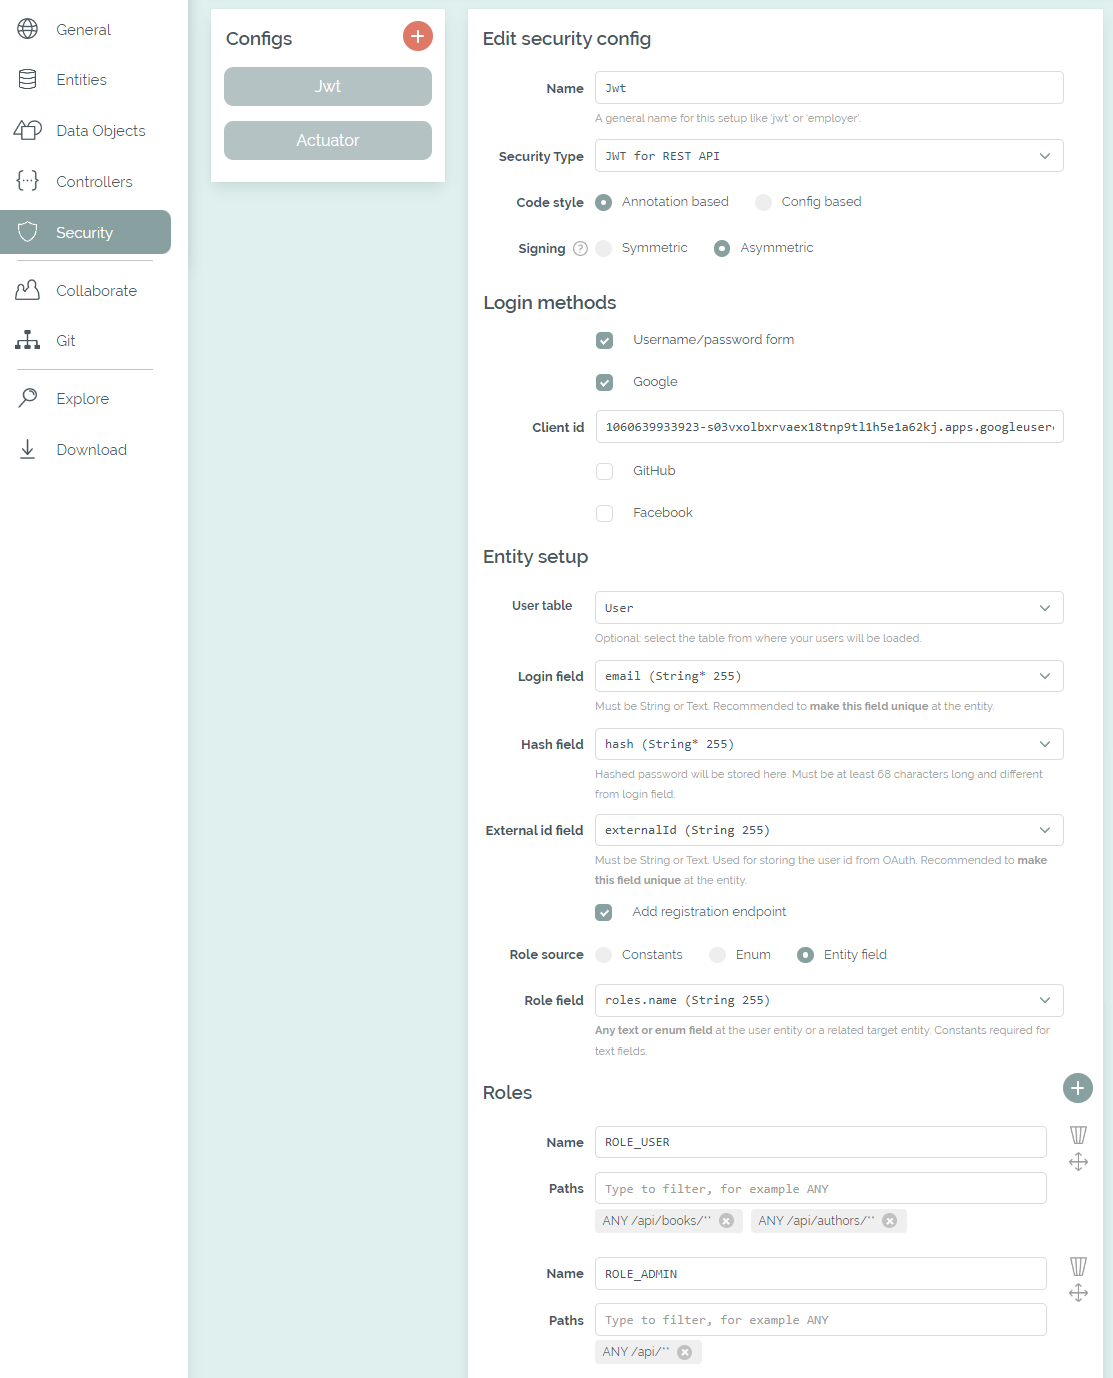
The Security tab with a selected user and role table
When a security config has been added, the necessary libraries, configurations and classes are included in the generated code. For the code style you can choose between Annotation based and Config based at your first config. If Annotation based is selected, the required role for an endpoint is provided as an annotation: @PreAuthorize("hasAuthority('" + ROLE_USER + "')"). Otherwise, the generated config class (for example JwtSecurityConfig) includes the configuration for all specified roles and their selected paths.
The options for form-based login and Keycloak via OAuth are only available for SSR frontends. All configs with these options will be integrated into Thymeleaf or jte. If Angular or React is the selected frontend stack, the first config with JWT or Keycloak resource server is integrated into the generated client.
Role and path selection
For each security config, any amount of role names can be specified which will be integrated as constants. If a user table has been selected, the roles can also be taken from an enum or a field in the database. If role field is in a referenced table, a RoleLoader class is added, which initializes all defined roles at application startup.

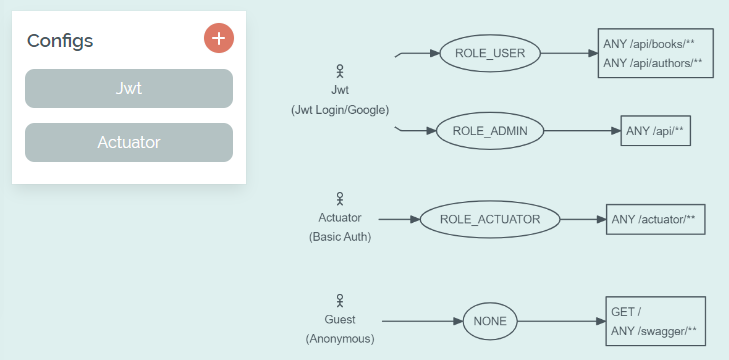
Overview of the selected roles and paths
All the paths that are available in the actual application can be selected, for example from the CRUD endpoints or custom controllers. With JWT or Keycloak Resource Server only REST endpoints can be protected. Please make sure to recheck your configuration after the paths of your application have changed.
The same path can be selected for multiple roles within one configuration, but multiple configurations cannot protect the same path - that's not possible in Spring Security. However, subpaths are possible and the generated code will add the @Order(...) annotations to your configs in the required order.
User table integration
The connection to a user table is optional. If this is not specified at all or incompletely, the implementation of the UserDetailsService will provide one static user per role (for example with the username "roleUser"). The password is always "Bootify!". If a username field is selected, it's recommended to make it unique at the entity - otherwise multiple users with the same login could be created, leading to unexpected errors.
If there are multiple security configs that share the same user table configuration, the generated code will reuse the respective classes. For example, if the configs for a form-based login and for JWT define the same user table and fields, one common implementation of the UserDetailsService is used.
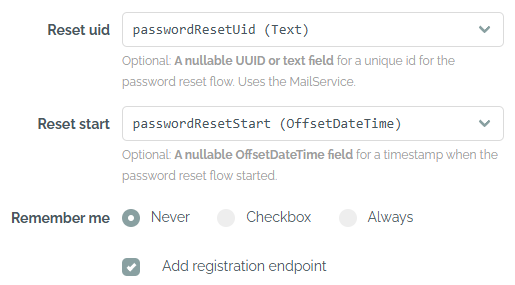
To add a password reset function for JWT or the form-based login, two fields of the user table can be selected. A unique ID can be stored in a field of type String, Text or UUID. A second field of type OffsetDateTime must be selected for the start date - when the mail is sent, the current date is stored there so that the validity of the link is limited in time. The option for the MailService is always activated for the password reset. The HTML email was created with Bootstrap Email - see the original template and adjust it in the editor.

Selected columns for the password reset
A registration option is available for JWT and form-based login as well, which adds a RegistrationResource / RegistrationController to the generated code. This allows to add new users without authentication, either via the REST API or in the browser. If the user table has relations that are required, the generated code needs to be extended after the download.
If integration testing has been activated for the project, the BaseIT class is extended providing the required authorization, using a test user for each defined role (password "Bootify!"). If the setup with a user table was chosen, an additional SQL script is used to first create the test user before each test.
Backgrounds on JWT
With JWT, only requests with a valid JSON Web Token are accepted. They can be retrieved via calls to the AuthenticationResource. A deeper explanation of the technical backgrounds is available here.
The available login methods are a username/password form and social logins for Google, GitHub or Facebook. For the social logins, the code from the OAuth flow is transferred to and validated by the backend, after which the application issues its own JWT. Client ID and secret must be added to the code - details on creating the application can be found here for Google, GitHub and Facebook. Depending on the selected frontend, localhost:4200 or localhost:3000 should be entered as the redirect URL together with the path /completeLogin?provider=google|github|facebook.
If Angular has been selected as the frontend, components for login and registration are provided. The authentication.service.ts is connected to the provided API. The authentication.injectable.ts automatically adds the token to all outgoing requests to the API. The actual verification of the token takes place in the backend - however, the client checks in advance whether a login is required by looking up the required roles in the app.routes.ts. For React the components for login and registration are created as well. Most of the logic is contained in authentication-provider.tsx and the current login status is available through the custom hook use-authentication.ts.
The tokens are created in JwtTokenService using one of the selected algorithms. If a symmetric algorithm has been selected, a single secret is used for signing and validating the tokens using the HMAC512 algorithm. The secret is stored in application.properties / application.yml. That's a good option if no further party needs to validate the tokens and they are only used in our Spring Boot application.
If an assymetric algorithm has been selected, a private key is used for signing and a public key is used for validating the tokens, using the RSA256 algorithm. This way, the pubic key could be shared so that other parties can verify tokens as well. Although the secret and RSA keys are created individually for each project by Bootify, they should be changed after the download. A minimum length of 512 bits is required for the secret.
A table for storing refresh tokens can optionally be selected. It must be linked to the user table with an N:1 relation so that each token can be assigned to exactly one user. In addition to the String, Text or UUID field for the token, there must be one field of type OffsetDateTime for the expiry.

Refresh token with a remember-me option
After a table has been fully specified, a remember-me option can also be selected similar to the form login. With this option the refresh tokens will have a higher validity of up to 180 days.
The BaseIT class will provide a method bearerToken(), which is included as a header in the individual tests. The test user has the same username and password as mentioned above - however the JWT is directly stored in the code for the tests.
If Swagger UI has been enabled for the project, a SwaggerConfig is also included in the project to add authorization to the OpenAPI Specification. This will allow us to authorize with the JWT in the Swagger UI client. The endpoints for Swagger itself together with the mentioned Controllers are excluded from authorization. Please check out this article for a short walkthrough on how to work with the tokens.
Backgrounds on form login
With the form-based authentication, an AuthenticationController is added to the code in order to show the template authentication/login.html (Thymeleaf) or authentication/login.jte (jte) and provide required messages to the user. A RegistrationController is added as well if the respective option has been checked.
Generated controller when adding a form-based config
Social logins for Google, Github and Facebook can also be selected. The redirect URL here is localhost:8080 or localhost:8081 if a webpack option was selected, plus the path /login/oauth2/code/google|github|facebook. This path may also change if multiple security configs have been added.
A remember-me cookie can be selected for the form login as well. With the Always option, the cookie is automatically set with every login. With the Checkbox option, a checkbox is added to the login form with which the user can choose to remember their login. Settings such as the cookie lifetime can be adjusted in the rememberMe(...) section of the generated SecurityConfig class.
The BaseIT class will provide a method authenticatedSession() supporting one test user per role as described above. Thie methods performs a login transparently, so the integration tests can use a session with an authenticated user.
Backgrounds on Keycloak
If one of the options for Keycloak has been selected, an external Keycloak server in the latest version 26.0.8 is integrated into our Spring Boot application. The Keycloak resource server option prepares the application to act as a resource server, validating incoming tokens - backgrounds here. If Keycloak client has been selected, the SSR frontend is protected using OAuth / OIDC - backgrounds here.
If Angular is the frontend stack and Keycloak resource server is the first security config, the client is also directly integrated with Keycloak via OAuth/OIDC. This means that after successful login, the browser client has a token that is sent to the REST API within authentication.injectable.ts. The token is automatically renewed in authentication.service.ts when required. As with the JWT option, the client can already check the required roles from the data.roles field in the app.routes.ts. Backgrounds on the technical approach here.
For React the Keycloak resource server is integrated as well via the authentication-provider.tsx. Roles are checked from a route field handle: { roles: [USER] } and the useMatches() hook.

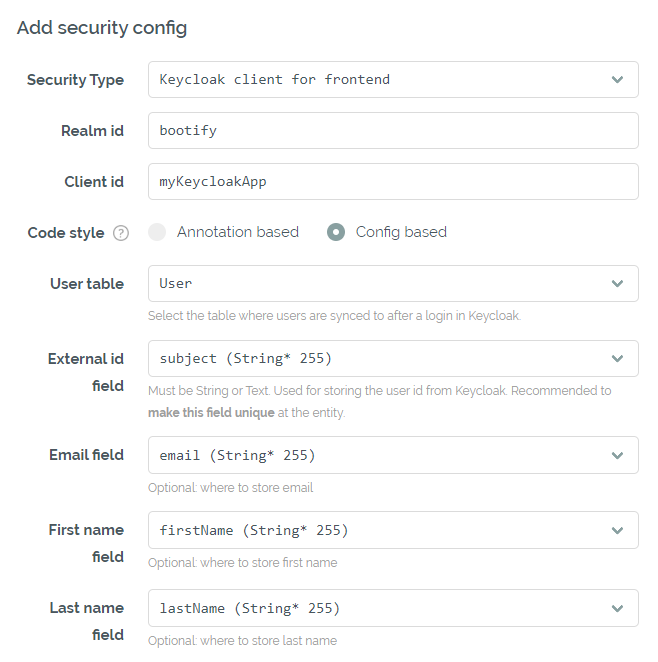
Keycloak configuration in the Security tab
The specified realm and client should be available on the Keycloak server and the generated secret must be entered in application.yml / application.properties. The Keycloak realm can also be initialized for development using the provided keycloak-realm.json - be aware, a test user is already included here for each role ("[email protected]" / "Bootify!"). If the option for Docker compose is activated, a Keycloak container is provided and initialized with the keycloak-realm.json file as well.
All security configs with a Keycloak option share the same realm, but use dedicated clients. The first role is the default role for the realm, while all other roles have to be assigned manually.
A user table can also be optionally selected here. After successful authentication, the user is created via the UserSynchronizationService and identified via the unique external ID. Email, first name and last name can be persisted as well - these fields are required by default when a new user registers itself in Keycloak.
When the integration tests are active for the project, a Docker image of Keycloak is started in the BaseIT class and initialized using the keycloak-realm.json. This allows to perform the OAuth flow or request a fresh token before accessing the application and have an authenticated session available for the further requests.
See Pricing
or read quickstart