Last updated: 2026-01-23
JPA Relationship Types with Examples
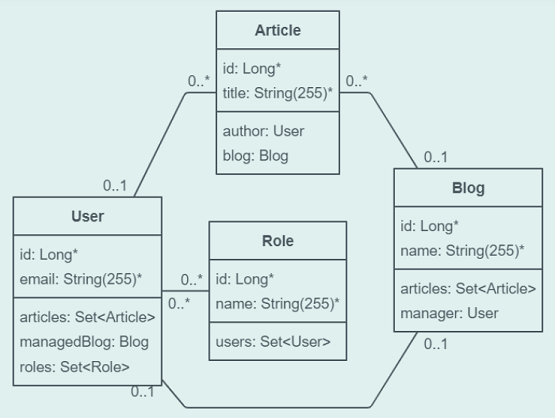
This article lists code examples for all relation types of JPA / Hibernate. For this we use the following simple database schema: an Article always belongs to a Blog (N:1), a User can be the author of multiple Articles (1:N), a Blog is always managed by one User (1:1) and a User can have multiple Roles (M:N).

Simple schema with all four JPA relationship types
Using Bootify, every relationship type can be created and viewed in the browser. Start Project and build your custom database schema - no registration required.
Many-to-one relationship
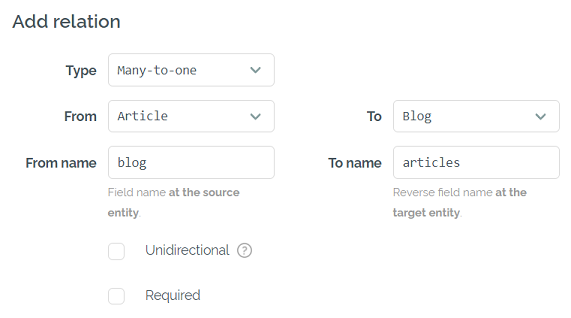
This link type is certainly the most common. In our example, an Article is associated with exactly one Blog, so a Blog can have several Articles.

Creating a Many-to-one relationship in Bootify
With these settings selected, the following field is added to the source entity.
New field at the source entity
By default @ManyToOne loads the referenced entity immediately via eager fetching. This should be changed to FetchType.LAZY to avoid oversized queries from Hibernate. The column containing the foreign key is specified with name = "blog_id" - it's based on the field name with an appended "_id".
New field at the target entity
The other side of this relation is defined at the target entity. We already provide an empty HashSet, as this is overwritten by Hibernate anyway and is more easy to access in our code.
With the attribute mappedBy = "blog" we refer to the field at the source entity that owns and defines the relation. Lazy fetching is already the default for this mapping type, so adding FetchType.LAZY is not necessary. In the code we could now fetch all articles of a specific blog object with blog.getArticles(). Unidirectional relationships do not provide the backward mapping.
One-to-many relationship
A One-to-many relationship corresponds to the Many-to-one version - only in reverse direction. Although ownership could theoretically be placed on the from-side, there is practically no use case for this.

Creating our One-to-many relationship
This results in the following mapping on the from-side, referencing the field at the target entity.
New field at the source entity
The ownership of the relation is on the to-side. The column name is defined in the annotation @JoinColumn again.
New field at the target entity
One-to-one relationship
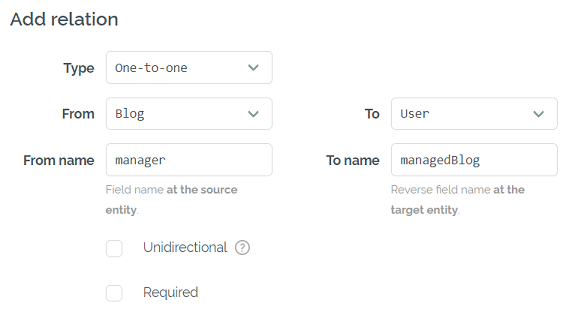
In our example, each blog is managed by exactly one user. We create this relationship in the following way.

Creating the One-to-one relationship
In most cases FetchType.LAZY should be used for One-to-one relations as well - unless the automatic loading is explicitly required. In the database there is a foreign key to the referenced table, which would basically also allow repetitions. Therefore we add unique = true to our column definition to create a real One-to-one relation.
New field at the source entity
Hibernate will add the unique constraint by itself. If Liquibase or Flyway is selected for schema generation, Bootify will insert the constraint to the changelog. The target entity also uses the @OneToOne annotation, referencing the specification at the source entity.
New field at the target entity
Many-to-many relationship
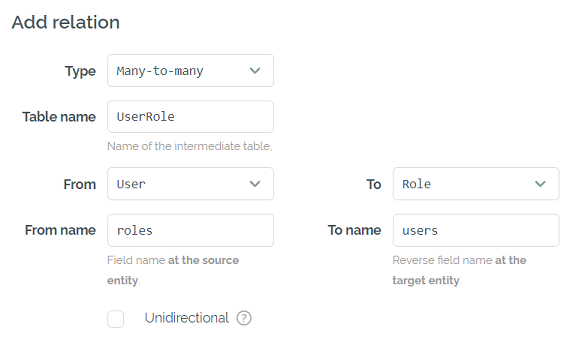
For the Many-to-many relation, a table name must also be specified where the role assignments will be stored. If additional fields are required at the intermediate table, it should be explicitly created as a separate entity and interlinked with two Many-to-one relations instead.

Creating our many-to-many relationship
This results in the following configuration at the from-side. The annotation @JoinTable defines how our "hidden" table looks like. The fields user_id and role_id form the composite primary key. Adding nullable = false is recommended, as non-null values would only make sense for legacy data.
New field at the source entity
Cascase types are not specified here for now - explicit handling of deletes and updates in the code allows more control and safety against unexpected changes. The backward side simply refers to our already defined mapping.
New field at the target entity
When we call user.getRoles() or role.getUsers() later in the code, Hibernate will perform a query on the user_role table and only returns the linked entities.
In the Bootify Builder a custom database schema including relations can be created. According to the selected database and preferences, the code is generated in such a way that an executable Spring Boot prototype is directly available.
Start Project
No registration required